How To Add Poll Widget To Blogspot [Easy Guide]
If you have your blog on blogspot, you would have noticed that some widgets are gone. Why was that? We really don’t know! In this article, I will share with you ways to add poll widget to Blogspot or blogger.
Among the widgets missing in Blogspot is Poll daddy. Previously it used to be one click installation but now, you have to use third-party widget codes to add a poll widget to Blogspot or blogger, which is what you will learn in this post.
What is a poll?
Poll, otherwise known as a survey, is a way to collect information from your blog visitors by seeking their opinions on matters important to you. E.g, as a News blogger, you may have a poll/survey asking people who the next President will be, and you may have a poll asking people to rate your blog.
Ways to add a poll widget to Blogspot
There are two simple ways to add a poll widget to Blogspot. They are; Using Powr.io and Easypolls.net.
How to add poll widget to blogspot using Powr.io
Powr.io used to be part of the widget in the blogspot’s widget zone, but not anymore. Powr.io has free and premium(paid) versions of blogger plugins. Go for the one your budget can take care of. But in free plugins, there are some adverts attached. Doesn’t make money for you but for the plugin developer.
To add poll widget to blogspot with powr.io, follow the steps below;
Step 1: Log on to powr.io website and sign up with either your Facebook profile or google gmail account.
Step 2: Upon successful signing up, go ahead to verify your email. After this, at the top-right-hand corner, you will see your profile. Click on it and you will see dropdown menus. Click on my plugins from the menus.
Step 3: When you click on my plugins, you will see a page where you can choose plugins that perform different functions. Click create new plugin
Step 4: When you click on create new plugin, you will see another page where you can choose the type of plugin you want to create. You can either search by typing Poll in the search box or use the category. Then scroll down to Poll. Click on Get App as shown in the diagram below.
Step 5: Time to set up the poll. After clicking on Get App, you will see a page asking you to create new poll as shown below. Click on it and you will see the next page.
• Click on Form to set the poll title, description and Vote button.
• Click on Settings to enter the admin email where you will receive answers to the poll when your visitors act on it.
• Click on Design to set up the general appearance of the poll widget.
When done, click to Add to Site.?
Step 6: After setting up the poll form, add to site. This will show the plans. If you are low on budget, click on Free plan and continue with free plan.
Step 7: Since you have chosen your plan, the next thing is to select the blogging platform, which is Blogger. Click on it.
Step 8: When you select the platform, the next page will show the widget codes. Select whether you want to Add to Page/Post or Blog Layout in the sidebar. Then copy the code to embed on your blog.
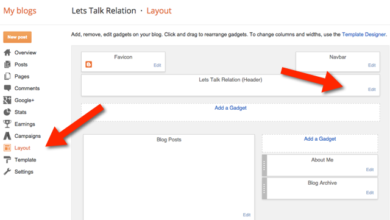
• Then go to your blog layout, choose Add Gadget, Click on HTML and paste the code. Then save. Boom! Then click I’ve installed on powr.io.
This is one of the ways you can add poll widget to Blogspot or any other blog platforms. Any question? Good!
SEE ALSO: Best Way To Rank Blogger (Blogspot) Blog On Google Easily
How to add poll widget to blogspot using Easypolls.net
This one has shorter steps, unlike powr.io. It also has free and paid versions. To add poll widget to blogspot with Easypolls, follow the steps below;
Step 1: Log on to Easypolls.net website and sign up or login with Facebook or Google and don’t forget to verify your email.
Step 2: After you have signed up or in, the next thing is to create your poll question, width, background and general appearance.
° The first column is Question and Answers area. Set it up accordingly.
° Second column is for the general appearance of the poll widget. You can choose the one that matches your blog appearance.
° The third column Option, if you want to allow multiple selections, width of the poll widget, if you want to show result if you want to display when poll is closed, and if you want to enable Facebook like and comment.
Step 3: When you enter your poll question and answers to select from, go to second column to choose the appearance that matches your blog. And then the third column. When done, click save that will show immediately below the area where you set up the poll. You will also see preview of the poll you’re creating in the right hand side of the page.
Step 4: After you might have saved it, it is time to copy the code and embed on your blog layout.
• Slide to the right side and copy the code as shown in diagram below.?
If you want it secured, tick secure and copy.
• Go to the Add Gadget area of the layout you want to Add it to, select HTML, paste the code, give it a title and save. Boom!
Warning: Don’t tweak anything from the code except you are using paid version. Leave it as it is.?
Wrapping up how to add poll widget to Blogspot
These are some of the ways bloggers can add poll widget to blogspot and even other blogging platforms. Poll on your blog helps you to collect information from your visitors to know how to improve or seek their opinions. To understand the technical part of Blogspot well, download my beginners eBook on blogspot now.
This tutorial has shown you how to add poll widget to Blogspot in a matter of minutes.
Were you able to add poll to your Blogspot? Let me know in the comment below if this tutorial helps you and don’t forget to subscribe.