How to Map/Connect Whogohost Domain To Blogspot (Best Guide)
This is a guide how you can map/connect Whogohost domain to Blogspot/Blogger. If you bought or planning to buy your custom domain from Whogohost, this guide is for you.
This descriptive guide will help you to;
- Map your Whogohost domain to Blogspot
- Map custom domain to blogspot on Whogohost
- Connect your custom domain on Whogohost with Blogger, and
- Make the blogger custom domain open Glo network
In these simple steps;
- Buy your domain from whogohost and login to your client area
- Go to Manage domain
- Go to Manage DNS
- Add New zone
- Add CNAME records and boom!
Do you prefer video guide? See it below:-
If you prefer article, continue below.
Your blog on Blogspot isn’t fully professional when you are still running free subdomain on it. To make it professional, you need a custom domain connected. And one of the best web hosting companies in Nigeria and also domain registrar is Whogohost.
After you buy your custom domain from Whogohost, follow the steps below to connect it with Blogspot
Steps to map/connect Whogohost domain to Blogspot
NOTE: These steps come in after your domain is bought and ready!
Step #1. Login to your Whogohost client area and locate your domain name you want to use.
Step #2. Click on the dots in front of the domain you want to connect with. Then click on Manage Domain as shown below.
Step #3. When you click on Manage Domain, you will see the section below. For your new domain, click on Add New Zone (for you to create new zone). You just need one.
Step #4. When you click on Add Zone, do these;
- Input your domain in the URL section without the www in front. Like this: entloaded.com.ng.
- Then input this IP address: 174.129.25.170
- When you do the above, then save.
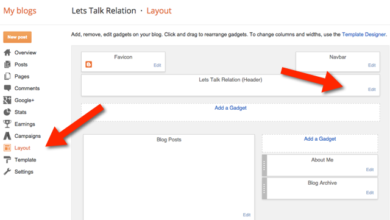
Step #5. After creating a zone for your domain, click on the settings icon in front. See the diagram below.
Step #6: Locate the third section of the area showing the first CNAME. Change the RDATA value to ghs.google.com
Step #7: Go to your Blogspot dashboard and add your custom domain. Add it like: www.entloaded.com.ng (You should replace this with yours). When you do, click on save. You will see error message. Copy the codes separately as shown below. The shorter code first, then the longer code.
Step #8: Go back to Whogohost Domain Manager area (like in step 6) and click on Add New Record. Select CNAME, and then add the codes from your blogspot dashboard. Use the longer code you copied from blogspot dashboard and use it as the RDATA as shown in the diagram above and below. Then save.
When you save, wait for about 30minutes to 1hour and go back to your Blogspot dashboard to click on save.
What to do after connecting custom domain to blogspot
Once your domain is correctly connected with blogspot, you should see something like this?
- Click on edit and tick redirect www.yourdomain.com to yourdomain.com then save again.
- Finally, click here to make your custom domain on blogspot open on Glo network in Nigeria.
Wrapping up how to map/connect whogohost domain to Blogspot
This article has, in details, describes and give you the exact guide you need to map/connect Whogohost domain to Blogspot or Blogger platform.
Don’t enjoy it alone, share with friends, subscribe and drop a comment below.
CHECK OUT: How to make Blogger/Blogspot rank on Google